

How To Create A Table In Wordpress Without Plugin
A table of contents for WordPress posts and articles is a clever thing. Visitors have a quick overview, SEO benefits and chic design really enhance your post!
Advertisement
It is simply too cumbersome to create a new table of contents in every post or to update it when changes occur. Installing a plugin for such a "little thing" is also not a good solution, as it only slows down the site and – as you will see in a moment – you can easily code it yourself.
If you have little or no programming experience, you can still use this table of contents. This is no problem! If there are any questions left, I can also try to help you with the comments.
This is what our end result will look like:
Table of Contents −
- Step 1: Generate table of contents (PHP script)
- Step 2: Style the table of contents (CSS)
- Variant 1 - Minimalistic
- Variant 2 - Rounded Main
- Step 3: Expand and collapse table of contents (JavaScript)
- Step 4: Include directory in individual contributions
The complete code is programmed by myself and may be used free of charge for any purpose (also commercial) and may be modified as desired!
Step 1: Generate table of contents (PHP script)
For experienced programmers: This code must be included in the functions.php of the used theme (if used in the child theme).
For inexperienced programmers: In the backend menu (left margin) there is an item "Appearance". Navigate there to the submenu item "Theme Editor" and then select the "Theme Functions" (functions.php) on the right side under "Theme Files". There you can scroll to the very end and after the last line of code insert 2-3 empty lines and then insert and save the PHP code below 1:1.
Advertisement
function get_toc($content) { // get headlines $headings = get_headings($content); // parse toc ob_start(); echo "<div class='table-of-contents'>"; echo "<span class='toc-headline'>Table Of Contents</span>"; echo "<!-- Table of contents by webdeasy.de -->"; echo "<span class='toggle-toc custom-setting' title='collapse'>−</span>"; parse_toc($headings, 0, 0); echo "</div>"; return ob_get_clean(); } function parse_toc($headings, $index, $recursive_counter) { // prevent errors if($recursive_counter > 60 || !count($headings)) return; // get all needed elements $last_element = $index > 0 ? $headings[$index - 1] : NULL; $current_element = $headings[$index]; $next_element = $index < count($headings) ? $headings[$index + 1] : NULL; // end recursive calls if($current_element == NULL) return; // get all needed variables $tag = intval($headings[$index]["tag"]); $id = $headings[$index]["id"]; $classes = $headings[$index]["classes"]; $name = $headings[$index]["name"]; // element not in toc if($current_element["classes"] && in_array("nitoc", $current_element["classes"])) { parse_toc($headings, $index + 1, $recursive_counter + 1); return; } // parse toc begin or toc subpart begin if($last_element == NULL || $last_element["tag"] < $tag) echo "<ul>"; // build li class $li_classes = ""; if($current_element["classes"] && in_array("toc-bold", $current_element["classes"])) $li_classes = " class='bold'"; // parse line begin echo "<li" . $li_classes .">"; // only parse name, when li is not bold if($current_element["classes"] && in_array("toc-bold", $current_element["classes"])) { echo $name; } else { echo "<a href='#" . $id . "'>" . $name . "</a>"; } if(intval($next_element["tag"]) > $tag) { parse_toc($headings, $index + 1, $recursive_counter + 1); } // parse line end echo "</li>"; // parse next line if(intval($next_element["tag"]) == $tag) { parse_toc($headings, $index + 1, $recursive_counter + 1); } // parse toc end or toc subpart end if($next_element == NULL || $next_element["tag"] < $tag) echo "</ul>"; // parse top subpart if($next_element != NULL && $next_element["tag"] < $tag) { parse_toc($headings, $index + 1, $recursive_counter + 1); } } function get_headings($content) { $headings = array(); preg_match_all("/<h([1-6])(.*)>(.*)<\/h[1-6]>/", $content, $matches); for($i = 0; $i < count($matches[1]); $i++) { $headings[$i]["tag"] = $matches[1][$i]; // get id $att_string = $matches[2][$i]; preg_match("/id=\"([^\"]*)\"/", $att_string , $id_matches); $headings[$i]["id"] = $id_matches[1]; // get classes $att_string = $matches[2][$i]; preg_match_all("/class=\"([^\"]*)\"/", $att_string , $class_matches); for($j = 0; $j < count($class_matches[1]); $j++) { $headings[$i]["classes"][] = $class_matches[1][$j]; } $headings[$i]["name"] = $matches[3][$i]; } return $headings; } With this code all headings are read out, summarized and output again as table of contents.
You can include the table of contents in your posts in two different ways.
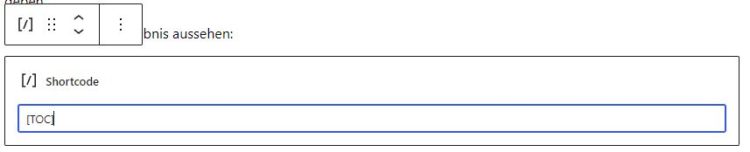
Option 1: If you want to set the position in each post yourself using the Shortcode TOC, then add this code as well:
// TOC (from webdeasy.de) function toc_shortcode() { return get_toc(get_the_content()); } add_shortcode('TOC', 'toc_shortcode'); Option 2: If you want the table of contents to be inserted automatically after the first paragraph in each post, then add this code as well:
function add_table_of_content($content) { if (!is_single()) return $content; $paragraphs = explode("</p>", $content); $paragraphs_count = count($paragraphs); $middle_index= absint(floor($paragraphs_count / 2)); $new_content = ''; for ($i = 0; $i < $paragraphs_count; $i++) { if ($i === 1) { $new_content .= get_toc($content); } $new_content .= $paragraphs[$i] . "</p>"; } return $new_content; } // add our table of contents filter (from webdeasy.de) add_filter('the_content', 'add_table_of_content'); If you want to output the table of contents only after the second paragraph, you can simply adjust the number in line 10.
Do you want to earn money with your website or blog? Then check out this post about Google Adsense, one of the biggest advertising services on the internet.
Step 2: Style the table of contents (CSS)
Your table of contents is already generated with the previous code. But it would be output as a normal list <ul>. To make the whole thing look a bit nicer, we also add a few lines of CSS.
Advertisement
For experienced programmers: This code must be inserted into a CSS file of the used theme (if used in the child theme). Often this is the top level style.css in the theme folder by default.
For inexperienced programmers: In the same menu item as with the PHP code, you can simply select "Stylesheet" (style.css) on the right. There you also go back to the end and add the following code after the last line and then save the file.
I have created two different styles. Just use the code from the table of contents that you like best.
Variant 1 – Minimalistic
See the Pen WordPress TOC Style 1 by WebDEasy (@WebDEasy) on CodePen.
CSS code for it:
/* Adjust these variables for your project */ :root { --dark-grey: #333333; --main-color: #036773; --font-size: 16px; --line-height: 1.2; } .table-of-contents { margin: 4rem 0; position: relative; } .table-of-contents .toc-headline { font-size: 22px; color: var(--dark-grey); font-weight: 600; display: block; cursor: pointer; } .table-of-contents .toggle-toc { position: absolute; top: 0; right: 1rem; font-size: 30px; cursor: pointer; font-weight: 800; color: var(--main-color); } .table-of-contents ul { padding: 0; padding-left: 1rem; } .table-of-contents li { position: relative; padding-left: 1rem; list-style: none; line-height: var(--line-height); font-weight: 400; margin: .3rem 0; transition: .2s ease all; } .table-of-contents li:hover { padding-left: 1.1rem; } .table-of-contents li a { font-size: var(--font-size); line-height: var(--line-height); text-decoration: none; color: var(--main-color); } .table-of-contents li:before { content: ''; -webkit-transform: translateX(-0.75em) rotate(45deg); transform: translateX(-0.75em) rotate(45deg); height: 0.5em; width: 0.5em; border-top: solid 2px var(--dark-grey); border-right: solid 2px var(--dark-grey); border-radius: 0; background: 0 0; position: absolute; display: block; top: 7px; left: 0; } .table-of-contents li>ul { padding-left: 0.7rem; padding-bottom: 1rem; } Variant 2 – Rounded Main
See the Pen WordPress TOC Style 2 by WebDEasy (@WebDEasy) on CodePen.
CSS code for it:
Advertisement
/* Adjust these variables for your project */ :root { --dark-grey: #333333; --background-color: #eee; --main-color: #036773; --font-size: 16px; --line-height: 1.2; } .table-of-contents { margin: 4rem 0; position: relative; background-color: var(--background-color); padding: .5rem 1rem; border-left: 5px solid var(--main-color); border-radius: 5px; } .table-of-contents .toc-headline { font-size: 22px; color: var(--dark-grey); font-weight: 600; display: block; cursor: pointer; margin-top: .3rem; } .table-of-contents .toggle-toc { position: absolute; top: .8rem; right: .8rem; font-size: 20px; cursor: pointer; font-weight: 800; color: #FFF; width: 1.5rem; height: 1.5rem; display: flex; justify-content: center; align-items: center; border-radius: 50%; line-height: 10px; background-color: var(--main-color); } .table-of-contents ul { padding: 0; } .table-of-contents li { position: relative; list-style: none; line-height: var(--line-height); font-weight: 400; margin: .3rem 0; transition: .2s ease all; } .table-of-contents li a { font-size: var(--font-size); line-height: var(--line-height); color: var(--main-color); } .table-of-contents li>ul { padding-left: 1rem; padding-bottom: .5rem; } Now the table of contents looks better and is also recognizable as such. Of course, you can adapt everything to your theme and your wishes.
Step 3: Expand and collapse table of contents (JavaScript)
With this code visitors can expand and collapse the table of contents.
document.querySelectorAll('.table-of-contents .toggle-toc, .table-of-contents .toc-headline').forEach(toggler => { toggler.addEventListener('click', function() { let tocList = document.querySelectorAll('.table-of-contents ul')[0]; let toggler = document.querySelectorAll('.table-of-contents .toggle-toc')[0]; if(tocList.style.display == 'none') { tocList.style.display = 'block'; toggler.innerHTML = '-'; } else { tocList.style.display = 'none'; toggler.innerHTML = '+'; } }); }); For experienced programmers: You can simply insert this into an existing JS file.
For inexperienced programmers: In the theme editor there is usually a js folder with .js files or directly a file with the extension .js. Just select a file and paste the code at the very end.
Step 4: Include directory in individual contributions
If you have chosen option 1, in order to output the table of contents on a page now, you simply have to insert the shortcode TOC in the backend editor of the respective post.
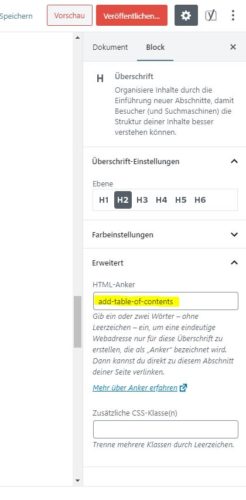
To ensure that the individual headings are also linked, they require a so-called HTML anchor. Again, there are two possibilities. Either a script inserts them for you automatically (option 1) or you insert them manually (option 2).
Possibility 1:
Advertisement
The script was recommended to me by a reader (thank you!) and he seems to have got it from this site.
Note that you put this code before the PHP code from point 1.
/** * Automatically add IDs to headings such as <h2></h2> */ function auto_id_headings( $content ) { $content = preg_replace_callback('/(\<h[1-6](.*?))\>(.*)(<\/h[1-6]>)/i', function( $matches ) { if(!stripos($matches[0], 'id=')) { $matches[0] = $matches[1] . $matches[2] . ' id="' . sanitize_title( $matches[3] ) . '">' . $matches[3] . $matches[4]; } return $matches[0]; }, $content); return $content; } add_filter('the_content', 'auto_id_headings'); Possibility 2:
To insert the anchors manually, click on the headline and insert an anchor under "Advanced". The name is up to you, but it should fit the headline.
That's all! If you look at the page now, the table of contents should be displayed.
If you want to exclude one or more menu items (like this headline :)), so that they are not displayed in the table of contents, you can additionally give the respective headline the CSS class nitoc. The script will then ignore them.
Conclusion
You did it! With just a few lines of code you can now always generate your own table of contents and don't have to resort to ready-made plugins anymore. Or even worse: always write and update the tables of contents yourself. Have fun with it! 🙂
How To Create A Table In Wordpress Without Plugin
Source: https://webdeasy.de/en/wordpress-table-of-contents-without-plugin/
Posted by: cainrothe1964.blogspot.com
0 Response to "How To Create A Table In Wordpress Without Plugin"
Post a Comment